
Stained Glass Glue Window Art
Stained Glass Glue Window Art
Stained glass glue window art is a fun and creative project that anyone can enjoy. This beautiful art can brighten up any window and add a splash of color to your home. Using simple materials, you can create your very own stained glass designs that make lovely decorations.
Why Make This Recipe
Making stained glass window art is a fantastic way to express your creativity. It’s also a relaxing activity that you can do alone or with family and friends. Not only do you get to make something beautiful, but you can also enjoy the colorful designs as they shine in the sunlight.
How to Make Stained Glass Glue Window Art
Ingredients:
- 1 plastic sheet protector, laminator pouch, or clear plastic lid
- Clear school glue (about 1/2 bottle per design)
- Black glue (or make your own by mixing black acrylic paint into clear glue)
Directions:
- Start by deciding on a design that you’d like to create.
- Use the black glue to outline your design on the plastic sheet protector.
- Allow the black glue to dry completely.
- Once dry, fill in the spaces with clear school glue to create the stained glass effect.
- Let the glue dry thoroughly, which may take several hours.
- Once dry, carefully peel off the design from the plastic.
- Display your stained glass art in a window for a beautiful effect.
How to Serve Stained Glass Glue Window Art
To serve your stained glass art, simply hang or place it in a sunny window where it can catch the light. The colors will glow, creating a vibrant display that everyone will enjoy.
How to Store Stained Glass Glue Window Art
If you need to store your stained glass art, keep it flat in a safe place. Avoid stacking heavy items on top, as it may cause the designs to bend or break. You can also use a folder to keep them protected.
Tips to Make Stained Glass Glue Window Art
- Start with simple designs if you are new to this project.
- Use colors that blend well together for a harmonious look.
- Try to keep the glue within the lines of your design to maintain a neat appearance.
Variation
You can create themed designs based on holidays or seasons. For example, make pumpkins for Halloween or snowflakes for winter. You can also experiment with different colors of glue to create unique effects.
FAQs
1. Can I use food coloring with the glue?
Yes, you can add food coloring to clear glue if you want to create different colors, but make sure it blends well.
2. How long does it take for the glue to dry?
The glue may take several hours to dry completely, depending on the thickness of the layers you applied.
3. Is this project safe for kids?
Yes, this project is safe and can be a fun activity for kids. Just be cautious with the black glue, especially if using acrylic paint, and supervise young children.
Making stained glass glue window art is an enjoyable and simple way to create colorful decorations. Gather your materials, follow the steps, and let your creativity shine!
Print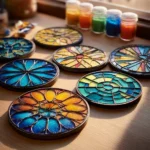
Stained Glass Glue Window Art
- Total Time: 255 minutes
- Yield: 1 design
- Diet: N/A
Description
A fun and creative project to create colorful stained glass decorations for your windows using simple materials.
Ingredients
- 1 plastic sheet protector, laminator pouch, or clear plastic lid
- Clear school glue (about 1/2 bottle per design)
- Black glue (or mix black acrylic paint with clear glue)
Instructions
- Decide on a design you want to create.
- Use the black glue to outline your design on the plastic sheet protector.
- Allow the black glue to dry completely.
- Fill in the spaces with clear school glue to create the stained glass effect.
- Let the glue dry thoroughly, which may take several hours.
- Carefully peel off the design from the plastic.
- Display your stained glass art in a sunny window for a vibrant effect.
Notes
Start with simple designs if you’re new to this project. Try using food coloring for different colors, but ensure it blends well. Keep glue inside the lines for a neater appearance.
- Prep Time: 15 minutes
- Cook Time: 240 minutes
- Category: Craft
- Method: Crafting
- Cuisine: N/A