Description
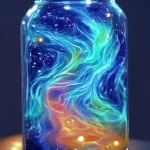
Create your own magical Northern Lights with this glowing Aurora Borealis Jar! Perfect for decorating bedrooms, parties, or for a fun family craft night. This glowing jar captures the beauty of the auroras and adds an enchanting glow to any space.
Ingredients
– 🥫 1 clear glass or plastic jar with lid (mason jars work great)n- 🎨 Glow-in-the-dark paint (in aurora colors: green, blue, purple, pink)n- 🖌️ Small paintbrushes or sponge brushesn- 🖤 Black acrylic paint (optional, for outer coat)n- ☁️ Cotton balls (optional, for a cloud effect)n- ✨ Glitter (optional for extra sparkle)n- 💡 LED tea light or fairy lights (battery-operated)n- 💧 Water and a paper plate for easy cleanup
Instructions
1. Clean your jar thoroughly and dry it completely.n2. Use glow-in-the-dark paint to create streaks of aurora colors on the inside of the jar.n3. Add pulled-apart cotton balls between the painted areas for a cloudy sky effect.n4. Sprinkle glitter while paint is still wet for extra sparkle.n5. Let the jar dry completely.n6. Place an LED tea light or fairy lights inside the jar.n7. Optionally, paint the outside of the jar lid with black acrylic for a finished look.n8. Charge the jar under direct sunlight or a lamp to activate the glow.n9. Turn off the lights and enjoy your glowing aurora masterpiece!
Notes
– Try different patterns or dot effects with the glow paint.n- Great for kids’ night lights or themed party decor.n- Glow effect improves with stronger light charging before use.
- Prep Time: 10 minutes
- Cook Time: 0 minutes
- Category: Crafts
- Method: DIY
- Cuisine: N/A