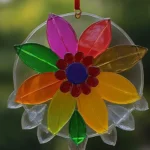
Description
The Colorful Glue Suncatcher is a fun and vibrant DIY craft that adds cheerful color to any window. Perfect for kids and adults!
Ingredients
– 🧴 White craft glue or school gluen
– 🥄 Plastic lid (from cottage cheese, sour cream, yogurt, etc.)n
– 🌈 Liquid food coloringn
– 🪥 Toothpickn
– 🧵 Embroidery flossn
– 🪡 Needlen
– 🔵 Pony beadsn
– 🔘 4-hole buttons
Instructions
1. Place the plastic lid upside down on a flat surface.n2. Fill the lid generously with white craft glue.n3. Add three drops of different food coloring spots inside the glue.n4. Use a toothpick to gently swirl the colors, creating a marbled effect.n5. Leave the lid undisturbed in a safe spot to dry for 5–6 days.n6. After 4 days, check if the glue has dried by gently pulling a small section.n7. Once fully dry, peel your suncatcher from the lid.n8. Thread embroidery floss through a needle, poke it through the bottom of the suncatcher, and remove the needle.n9. Repeat to create three hanging strings about 8–9 inches long.n10. Thread about 8 pony beads on each string for decoration.n11. Use two strings and thread them through a 4-hole button, then knot securely three times.n12. Thread another piece of floss through the top of the suncatcher to create a hanger.n13. Add about 7 beads on the hanging floss, loop back through the final bead, and pull tight.n14. Hang your beautiful suncatcher in a sunny window and enjoy the light show!
Notes
– Try different lid shapes or cookie cutters for unique designs.n- Add glitter or small bits of tissue paper to the glue for extra flair.n- Make sure the suncatcher dries undisturbed to prevent cracking.
- Prep Time: 10 minutes
- Cook Time: 0 minutes
- Category: Crafts
- Method: DIY
- Cuisine: N/A